Saturday, March 5, 2011

How to uninstall Exchange Server 2007 and individual server roles


How to uninstall Exchange Server 2007 and individual server roles
Uninstalling Microsoft Exchange Server 2007 isn't as simple as running Setup and choosing the uninstall option. Moving specific server roles to different hardware can also be difficult because there are several required removal tasks that aren't outlined or available through the Exchange 2007 Setup wizard. The Mailbox and Hub Transport server roles are particularly challenging because there are complicated steps involved in uninstalling them.
This tutorial takes the guesswork out of removing Exchange Server 2007 or individual server roles from a computer. It provides detailed instructions on how to uninstall Exchange 2007 and its associated server roles, including the Client Access server role, Edge Transport server role, Hub Transport server role and Mailbox server role.
Part 1: How to begin an Exchange 2007 uninstall
Whether you wish to perform a complete uninstall of Exchange Server 2007 or only specific server roles, the beginning portion of the uninstall process is fairly straightforward:
  1. On the server, go to Control Panel -> Add/Remove Programs.
  2. Select Microsoft Exchange Server 2007 from the list of installed programs.
  3. Click Remove to launch the Exchange Server 2007 Setup wizard.
  4. Click Next to bypass the Welcome screen and view a screen similar to that in Figure A, asking you which roles you want to remove.

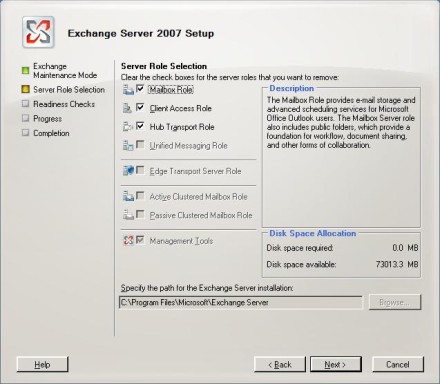
Figure A. Use the checkboxes to remove server roles.
  1. Clear the checkboxes corresponding to the roles you want to remove and click Next.
You can use the above process whether you want to remove an individual role from the server, or uninstall Exchange Server 2007 completely. When you click Next, the Setup wizard will perform a readiness check -- and that's where the trouble begins.
Exchange Server 2007 Setup wizard doesn't know how to deal with an uninstallation or role removal. This means that there are several tedious tasks that you will have to manage prior to removing various roles. The Exchange Server 2007 Setup wizard instructs you as to which tasks you must perform, as shown in Figure B.


Figure B. The Setup wizard outlines several tasks you must
perform prior to uninstalling Exchange Server 2007.

Unfortunately, the wizard doesn't give specific instructions on to how to perform these tasks, some of which include using the Recommended Action link to get more information. In addition, the Web sites that Recommended Actions are linked to are vague. In the remaining sections of this tutorial, I explain how to perform these tasks and provide step-by step instructions for properly uninstalling the Client Access, Edge Transport, Mailbox and Hub Transport server roles.
Part 2: How to uninstall the Exchange 2007 Client Access server role
Removing the Client Access server role is fairly simple:
  1. On the Exchange Server, go to Control Panel -> Add/Remove Programs.
  2. Select Exchange Server 2007 from the list of installed applications, and click Remove to launch the Exchange 2007 Setup wizard.
  3. Click Next to bypass the welcome screen and move to a screen displaying various Exchange 2007 server roles that have been installed.
  4. Deselect the checkbox corresponding to the Client Access role, and click Next.
The Exchange Server 2007 Setup wizard will now check to make sure that it can remove the Client Access server role. Because there are no prerequisites that must be met, the Setup wizard will confirm that everything is ready and then begin removing the associated files.
For this particular server role, note that the Setup wizard will not prompt you to continue once prerequisite checks are completed. It will remove the Client Access Server (CAS) role -- whether you're ready or not.
The amount of time that it takes to remove the CAS role varies from server to server. On my test system, however, the entire process took just over five minutes from start to finish.
Part 3: How to uninstall the Exchange 2007 Edge Transport server role
Exchange Server 2007 Edge Transport servers are unique in that they're not connected directly to Active Directory or the rest of the Exchange organization. Instead, they use an Edge Subscription to replicate a minimal amount of information from Active Directory to a special Active Directory Application Mode (ADAM) partition stored on the server.
From a removal standpoint, this means that there is virtually no affect on your Exchange organization if you decommission an Edge Transport server. The only task you need to do prior to removing an Edge Transport server is eliminate the Edge Subscription.
There are two methods to remove an Edge Subscription. While these methods weren't verified in a lab environment, they both should work:
  • Method 1
    Open the Exchange Management Console from within your primary Exchange organization (not on the Edge Transport server, and navigate through the console tree to Organization Configuration -> Hub Transport. Select the Hub Transport container, and then select the Edge Subscriptions tab from the details pane. Now right click on the Edge Subscription you want to remove, and select Delete from the menu.
  • Method 2
    Open the Exchange Management Shell and enter the Remove-EdgeSubscription command. For the exact syntax of this command, read the Remove-EdgeSubscription description on the Microsoft Exchange Server TechCenter.
Part 4: How to uninstall the Exchange 2007 Hub Transport server role
When removing roles from Exchange Server 2007, two tend to be the most difficult: the Mailbox server role and the Hub Transport server role. The steps involved in removing the Hub Transport server role vary depending on whether there are other Exchange servers in your organization. The version of Exchange Server used on your servers also makes a difference. It is more work to uninstall the Hub Transport server role if there are Exchange 2003 servers in the organization than if Exchange 2007 was the only version in use.
Let's assume that you have some Exchange 2003 servers in your organization. If all Exchange servers are running Exchange 2007, or if your organization only consists of one server, then you may be able to skip some of these steps:
  1. On the Exchange server, go to Control Panel -> Add/Remove Programs to view a list of all installed applications.
  2. Select Exchange Server 2007 from the list of programs and click Remove.
  3. When Windows launches the Exchange Server 2007 Setup wizard, click Next to bypass the Welcome screen..
  4. You will now see a screen that displays the various Exchange 2007 server roles that have been installed. Deselect the checkbox corresponding to the Hub Transport role and click Next.
  5. The Setup wizard will perform a prerequisite check, because there are some steps that must be taken before the role can be removed. Specifically, the server hosting the Hub Transport role is configured, by default, to act as a bridgehead server for the various routing group connectors. These routing group connectors must be removed before the Hub Transport server role can be uninstalled.
If you have Exchange 2003 servers installed, then Exchange 2007 doesn't natively use routing groups, but will create them for backward-compatibility purposes. To eliminate necessary routing group connectors:
  1. Go to your Exchange 2003 server and open the Exchange System Manager.
  2. Navigate through the console tree to Administrative Groups -> your administrative group -> Routing groups -> your routing group -> Connectors.
  3. Select the Connectors container and the details pane will show you connectors for the routing group.
The actual connectors that exist will differ from one deployment to another. Typically, there will be an Internet Mail SMTP connector and a routing group connector.
  1. Right click on the routing group connector, and select Properties from the menu.
  2. Go to the Remote Bridgehead tab, and check that the remote bridgehead server listed is one from which you want to remove the Hub Transport server role.
  3. If so, you can do one of two things:
    • Point the connector to a different remote bridgehead server.
    • Remove the connector completely.
  4. To remove the routing group connector, click OK to close the connector's properties sheet.
  5. Right click on the connector and select Delete from the menu.
  6. When Exchange asks if you really want to delete the connector, click Yes.
Exchange Server 2007 resources:
There likely will be at least one more connector to delete. Although Exchange 2007 doesn't natively use administrative groups, it does create an administrative group for backward-compatibility purposes. This group contains its own routing group, which contains a connector. The name of this administrative group differs in each Exchange organization. By default, it is called the Exchange Administrative Group.
A long hexadecimal number in parenthesis should follow the words Exchange Administrative Group. It will also follow the default routing group within this administrative group. It is called the Exchange Routing Group, and will be followed by a long hexadecimal number in parenthesis.
To remove the associated routing group connector:
  1. Navigate through the console tree to Administrative Groups -> Exchange Administrative Group (long hexadecimal number) -> Routing groups -> Exchange Routing Group (long hexadecimal number) -> Connectors.
  2. Select the Connectors container, and the details pane will display a routing group connector.
  3. Right click on the routing group connector, and choose Properties from the menu.
  4. You will see a message informing you that you need a newer version of Exchange System Manager to edit the object. Click OK to ignore the message and go to the routing group's properties sheet.
  5. Look at the Remote Bridgehead tab. Because this routing group connector exists on an Exchange 2007 server, the remote bridgehead should point to a server in your 2003 routing group.
  6. Verify this and click OK to close the properties sheet.
  7. Right click on the routing group connector and choose Delete from the menu.
  8. Click Yes, when prompted, to remove the connector.
  9. Wait for the servers to synchronize with one another. Then go back to your Exchange 2007 server and try to remove the Hub Transport role. The server should now pass the prerequisite test.
  10. Once the readiness check is complete, click Uninstall to remove the Hub Transport role.
Part 5: How to uninstall the Exchange 2007 Mailbox server role
To uninstall the Mailbox server role, you must remove all mailboxes and public folders stored on the server.
To remove all mailboxes from the server:
  1. Open the Exchange Management Console and navigate through the console tree to Recipient Configuration -> Mailbox to view all the mailboxes in your organization.
  2. Identify the mailboxes stored on that server. If you only have one Exchange 2007 server in your organization, this won't bet an issue.
Mailboxes residing on an Exchange 2007 server are marked as User mailboxes, or other types of mailboxes. Any mailbox residing on Exchange 2000 or 2003 servers are listed as Legacy mailboxes (Figure C).
Figure C
Figure C. Legacy mailboxes reside on Exchange 2000 or 2003 servers.
I have only a few Exchange mailboxes, which isn't typical for most companies. If you can't tell which mailboxes are hosted on an Exchange 2007 server by looking at the console, then you can implement a display filter:
  1. Click the Create Filter link at the top of the console. You will see a series of dropdown lists.
  2. Choose Server from the first dropdown list, and make sure that the second dropdown list is set to Equals.
  3. Click Browse and select the server from which you want to remove the Mailbox server role.
  4. Click Apply Filter, and the list of mailboxes will be filtered so that only those residing on the specified server are shown (Figure D). This figure also gives an example of how I set up the display filter.
Figure D
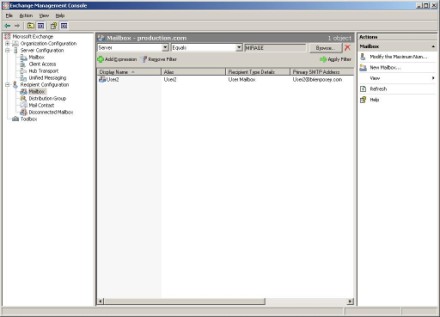
Figure D. A display filter can help you determine which mailboxes reside on the server.
  1. Now that you know which mailboxes reside on the server, you have to move them. Right click on the mailboxes you want to move -- you can select multiple mailboxes -- and choose Move Mailbox from the menu to launch the Move Mailbox wizard.
  2. Select the server and information store where you want the mailboxes moved (Figure E).
Figure E
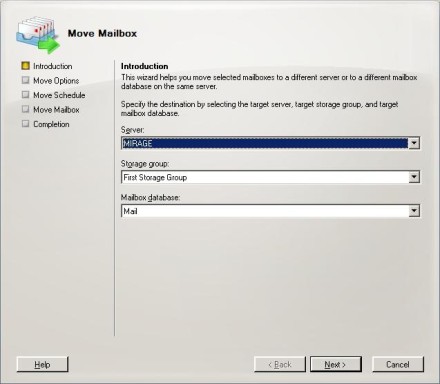
Figure E. Select a destination for the mailboxes you are moving.
  1. Click Next, and you will be asked how you want to deal with corrupt mailboxes and when the move should occur.
  2. Answer these prompts and click Move to move the mailbox.
  3. When this is complete, you will see a summary screen informing you that all mailboxes were moved successfully. Confirm that there are no mailboxes on the target server. To do this, go back to the Exchange Server 2007 Setup wizard, and click Retry. If you have moved all of the mailboxes off the server, then the warning message should disappear.
Removing the public folder tree
There is one more step involved in uninstalling the Mailbox server role from Exchange 2007. Now that you've removed all mailboxes, you must remove all public folders as well.
Microsoft initially shipped Exchange Server 2007 before it was complete. As such, there no mechanisms in the graphical user interface (GUI) to remove public folders. Service Pack 1, which will be released within the next few months, should correct this problem. Until then, you need to use the Exchange Management Shell to remove public folders.
Note: This procedure assumes that you have replicas of your folders on other servers. This is important because we aren't migrating public folder data to another server. Instead, we are deleting public folders from our target server.
  1. Open the Exchange Management Shell and enter the following commands (where yourserver is the name of the target server):
Get-PublicFolder –ID '\' –Server yourserver -Recurse –ResultSize Unlimited -> Remove-PublicFolder –Recurse
Get-PublicFolder –ID \'Non_Ipm_Subtree' –Server yourserver -Recurse –ResultSize Unlimited -> Remove-PublicFolder –Recurse
The first command removes all of the public folders, except for those that the system created. The '\' in the command indicates that the removal action should begin at the root-level of the public folder tree. The second command removes public folders created by Exchange Server. This can include things like the offline address book (OAB) or the folder used to store free/busy information. Both commands use an unlimited result size, which is important for organizations with large public folder trees.
  1. After executing both commands, enter the following command to display any public folders that weren't removed:
Get-PublicFolder –ID '\'
The instructions I just outlined should easily strip a public folder tree bare. There is a caveat though. I have found that those commands won't remove corrupted folders. So you may need to go back and manually reconfirm that all folders were removed.

Exchange 2007: Database Statistics in Powershell


http://exchangeshare.files.wordpress.com/2009/08/emsicon.png?w=37&h=51Many times we need to find number of mailboxes in each database and the size of the database (EDB file) of all servers in an Exchange 2007 environment. With PowerShell, it is fairly simple to grab in a single line.

1.  How do we find number of mailboxes in each database?
On Screen: Get-MailboxDatabase | Select Server, StorageGroupName, Name, @{Name="Number Of Mailboxes";expression={(Get-Mailbox -Database $_.Identity | Measure-Object).Count}} | Format-Table -AutoSize

Export to CSV: Get-MailboxDatabase | Select Server, StorageGroupName, Name, @{Name="Number Of Mailboxes";expression={(Get-Mailbox -Database $_.Identity | Measure-Object).Count}} | Export-Csv C:\ServerStat-1.csv

2.  How do we find number of mailboxes and size of EDB file for each Database?
On Screen: Get-MailboxDatabase | Select Server, StorageGroupName, Name, @{Name="Size (GB)";Expression={$objitem = (Get-MailboxDatabase $_.Identity); $path = "`\`\" + $objitem.server + "`\" + $objItem.EdbFilePath.DriveName.Remove(1).ToString() + "$"+ $objItem.EdbFilePath.PathName.Remove(0,2); $size = ((Get-ChildItem $path).length)/1048576KB; [math]::round($size, 2)}}, @{Name="Size (MB)";Expression={$objitem = (Get-MailboxDatabase $_.Identity); $path = "`\`\" + $objitem.server + "`\" + $objItem.EdbFilePath.DriveName.Remove(1).ToString() + "$"+ $objItem.EdbFilePath.PathName.Remove(0,2); $size = ((Get-ChildItem $path).length)/1024KB; [math]::round($size, 2)}}, @{Name="No. Of Mbx";expression={(Get-Mailbox -Database $_.Identity | Measure-Object).Count}} | Format-table -AutoSize

Export to CSV: Get-MailboxDatabase | Select Server, StorageGroupName, Name, @{Name="Size (GB)";Expression={$objitem = (Get-MailboxDatabase $_.Identity); $path = "`\`\" + $objitem.server + "`\" + $objItem.EdbFilePath.DriveName.Remove(1).ToString() + "$"+ $objItem.EdbFilePath.PathName.Remove(0,2); $size = ((Get-ChildItem $path).length)/1048576KB; [math]::round($size, 2)}}, @{Name="Size (MB)";Expression={$objitem = (Get-MailboxDatabase $_.Identity); $path = "`\`\" + $objitem.server + "`\" + $objItem.EdbFilePath.DriveName.Remove(1).ToString() + "$"+ $objItem.EdbFilePath.PathName.Remove(0,2); $size = ((Get-ChildItem $path).length)/1024KB; [math]::round($size, 2)}}, @{Name="No. Of Mbx";expression={(Get-Mailbox -Database $_.Identity | Measure-Object).Count}} | Export-CSV C:\ServerStat-2.csv

How a BlackBerry Infrastructure Works


How a BlackBerry Infrastructure Works

Components of a BlackBerry Infrastructure

BlackBerry Enterprise Server
BlackBerry Enterprise Server, also known as BES, manages flow of traffic between application servers and handhelds via BlackBerry's SRP network. The primary feature of BES from IT administrator perspective is ability to have granular control over BlackBerry devices. It allows capability to remotely deploy applications, wipe devices, lock devices and enforce security polices. BES delivers most of the functionality on the market to effectively manage fleet of BlackBerry devices.
BlackBerry Handheld Devices
You will find BlackBerry devices everywhere you go—at the mall, business meetings and on the belt of executives. BlackBerry devices allow executives to have information at their finger tips. When BlackBerry Handheld is part of  BlackBerry Infrastructure, functionality is endless. It allows real time push email, calendar sync, notes sync, tasks sync and support for third party applications.
Messaging Servers
Messaging Servers are a major part of BlackBerry Infrastructure. Microsoft Exchange Server is the most popular messaging server used in BlackBerry Infrastructure. BES also supports IBM Lotus Domino and Novell GroupWise as messaging servers. IT administrators must ensure that BlackBerry Enterprise Server can access messaging servers at all time to allow synchronization of data to BlackBerry devices.
Internet and Rim's SRP Network
BES must connect through the Internet and Rim's SRP Network to communicate with BlackBerry handheld. IT administrators usually do not have control over those networks but we can make sure our BES can talk to the internet and RIM's SRP Network.
How data flows in BackBerry Infrastructure
  1. BES picks up a new email message from Exchange Server in real-time.
  2. BES connects to RIM's SRP network--srp.blackberry.net on port 3101 via Internet.
  3. BlackBerry device is identified by its PIN and new email message is delivered.
BlackBerry Infrastructure


Useful Exchange 2007 Powershell commands

Useful Exchange 2007 Powershell commands:


Did you know that the Identity parameter is a “positional parameter”? That means you can use:
Get-Mailbox “domain\user” instead of: Get-Mailbox -Identity “domain\user”
It’s a neat usability shortcut!

To return all scripts that are found in your path, type:
Get-Command -Type ExternalScript
And for a useful shortcut, assign it in your profile as:
Function Get-Scripts { Get-Command -Type ExternalScript }

Are you tired of typing a long command every time that you want to do something? Alias it! Type:
Set-Alias GetSg Get-StorageGroup
For all the current aliases, type:
Get-Alias

The Exchange Management Shell is a calculator too! Try it directly in the command line:
1.2343+3123 or (23/435)*2

Command line 911! Do you need help? Type:
Help or -?
You can also perform wildcard character searches and partial name matches:
Help *UM*
And you can get more details about a cmdlet by using:
Get-Command

A quick shortcut to get all the parameters for a cmdlet is:
Get-Command | Format-List Definition
or abbreviated:
Gcm | Fl Def*

The tilde character ( ~ ) should be familiar to Unix users. It represents the shortcut to your root directory. To see what it’s evaluated to by default, type:
Dir ~
You can use it as a useful shortcut:
Cp SomeFile “~\My Documents”

Do you want to move mailboxes? Type:
Move-Mailbox
You can move all users from server SRV1 to server SRV2 as follows:
Get-Mailbox -Server SRV1 | Move-Mailbox -TargetDatabase SRV2

CTRL+C is the equivalent of the hard-break command in the Exchange Management Shell. If a command is taking too long to run or you want to cancel an operation quickly, press CTRL+C to stop execution.

Pushd and Popd work the same way in the Exchange Management Shell as they do in cmd.exe. Type:
Pushd

XML over everything! The Exchange Management Shell treats XML as a native type, so that you can do interesting things like:
$Sample = [XML](Get-Content SomeXMLFile.xml)
This command assigns $Sample to the actual XML object. To see it, type:
$Sample
To navigate it, type:
$Sample.Prop1.Prop2
No need for text parsing when you want to load XML data!

Cmdlets that end in “Config” manage singleton configuration, either one per server or organization. For these tasks, you don’t have to specify an identity because there is only one instance of the configuration. You may have to specify the Server parameter if the configuration is per server.

To get a list of all users on an Exchange 2007 server who are not Unified Messaging-enabled type, use:
Get-UmMailbox | ForEach { If($_.UmEnabled -Eq $False){$_.Name}}

To get a list of all users on an Exchange 2007 server who are Unified Messaging-enabled type, use:
Get-UmMailbox | ForEach { If($_.UmEnabled -Eq $True){$_.Name}}

To display the user’s alias formatted in a table together with the user’s Exchange 2007 server name and telephone extension, type:
Get-UmMailbox | Format-Table ServerName,@{e={$_.SamAccountName};Label=”User Alias”},@{Expression=”Extensions”;Label=”Telephone numbers”}

To display the list of UM IP gateway server names that are disabled for outbound calling and hunt groups that are associated with a UM IP gateway server, use:
Get-UmIpGateway | ForEach {If($_.OutCallsAllowed -Eq $False){ “Gateway Name = ” +$_.Name;ForEach ($HuntGroup In $_.Huntgroups){“Huntgroups ” + $Huntgroup}}}

If you want to test all IP Block List providers, you just have to pipe the Get-IpBlockListProvider cmdlet to the Test-IpBlockListProvider cmdlet:
Get-IpBlockListProvider | Test-IpBlockListProvider -IpAddress 192.168.0.1

Before you remove an object by using the Remove verb, use the WhatIf parameter to verify the results are what you expect.

Sometimes it’s useful to convert the output of a cmdlet to a string to interoperate with native cmdlets. For example, type:
Get-Command | Out-String | Findstr “command”

Get all Win32 WMI information, such as perfmon counters and local computer configurations. For example, type:
Get-WMIObject Win32_PerfRawData_PerfOS_Memory

Tired of spam? Who isn’t? You can configure real-time block list (RBL) providers with the Exchange Management Shell by running the following two commands:
Set-IPBlockListProvidersConfig -Enabled $True -ExternalMailEnabled $True
and then
Add-IPBlockListProvider -Name -LookupDomain -AnyMatch $True

Access the event log from the Exchange Management Shell. To retrieve the whole event log, run:
Get-EventLog Application | Format-List
To retrieve all Exchange-related events, run:
Get-EventLog Application | Where { $_.Source -Ilike “*Exchange*” }

One benefit of the Exchange Management Shell is that cmdlets can emit objects to the console. You can then manipulate this output and organize it in interesting ways. For example, to get a quick view in tabular format, use Format-Table:
Get-Mailbox | Format-Table Name,Database,RulesQuota

Did you forget a property name? Not a problem because you can use wildcard characters to retrieve all properties that match the part of the name that you specify:
Get-Mailbox | Format-Table Name,*SMTP*

Do you want to work with data that is contained in a CSV file? Use Import-CSV to assign the data to an object. For example, type:
$MyCSV = Import-CSV TestFile.CSV
You can then manipulate the data easily in the Exchange Management Shell. For example, if there is a column called Mailboxes in the CSV data, you can use the following commands to sort or group the data by the Mailboxes column:
To sort: $MyCSV | Sort Mailboxes
To group: $MyCSV | Group Mailboxes

This command spins through all your mailbox servers and reconnects all the uniquely identified but disconnected mailboxes in any one of the mailbox stores:
Get-ExchangeServer | `
Where { $_.IsMailboxServer -Eq ‘$True’ } `
| ForEach { Get-MailboxStatistics -Server $_.Name `
| Where { $_.DisconnectDate -NotLike ” } `
| ForEach { Connect-Mailbox -Identity `
$_.DisplayName -Database $_.DatabaseName} }

Tab completion reduces the number of keystrokes that are required to complete a cmdlet. Just press the TAB key to complete the cmdlet you are typing. Tab completion kicks in whenever there is hyphen (-) in the input. For example:
Get-Send
should complete to Get-SendConnector. You can even use regular expressions, such as:
Get-U*P*
Pressing the TAB key when you enter this command cycles through all cmdlets that match the expression, such as the Unified Messaging Mailbox policy cmdlets.

Do you want to create a group of test users in your lab? Use this command:
1..100 | ForEach { Net User “User$_” MyPassword=01 /ADD /Domain; Enable-Mailbox “User$_” -Database }

Do you want to change the authentication settings on an Outlook Web Access virtual directory? Try the following command as an example. It changes authentication from forms-based authentication to Windows authentication:
Set-OwaVirtualDirectory -Identity “OWA (Default Web Site)” -FormsAuthentication 0 -WindowsAuthentication 1

Do you want to set the properties on all or some Outlook Web Access virtual directories? Pipe the output of Get-OwaVirtualDirectory to the Set-OwaVirtualDirectory cmdlet. For example, the following command sets the Gzip level for all Outlook Web Access virtual directories:
Get-OwaVirtualDirectory | Set-OwaVirtualDirectory -GzipLevel High

Do you want to remove an ActiveSync device from a user’s device list? Type:
Remove-ActiveSyncDevice
This cmdlet can be helpful for troubleshooting devices that do not synchronize successfully with the server.

Do you want to clear all data from a mobile device? Use:
Clear-ActiveSyncDevice
Specify a time of day to clear the device, or let the task complete the next time that the device connects to the server.

Do you want to see a list of all devices that synchronize with a user’s mailbox? Type:
Get-ActiveSyncDeviceStatistics
A variety of information is returned including device name, operating system, and last sync time.

Has one of your users asked you to recover their mobile device synchronization password? To return the user’s password, type:
Get-ActiveSyncDeviceStatistics -ShowRecoveryPassword

Do you want to move the storage group path to another location? Type:
Move-StorageGroupPath -LogFolderPath DestLogFolder
To change only the path setting without moving data, use this command together with the ConfigurationOnly parameter. This command is especially useful for disaster recovery.

Caution:
Misuse of this cmdlet will cause data loss.
Do you want to move your database path to another location? Type:
Move-DatabasePath -EdbFilePath DestFileName
To change the file path setting without moving data, use this command together with the ConfigurationOnly parameter. This command is especially useful for disaster recovery.

Caution:
Misuse of this cmdlet will cause data loss.
To set the dial restrictions on a specific Unified Messaging dial plan, type:
$Dp = Get-UmDialPlan -Identity
$Dp.ConfiguredInCountryGroups.Add(“Group1,91xxxxxxxxxx,91xxxxxxxxxx”)
$Dp.ConfiguredInCountryGroups.Add(“Group1,9xxxxxxxxxx,91xxxxxxxxxx”)
$Dp.ConfiguredInCountryGroups.Add(“Group1,9xxxxxxx,9xxxxxxx”)
$Dp.AllowedInCountryGroups.Add(“Group1″)
$Dp.OutsideLineAccessCode = 9
$Dp | Set-UmDialPlan

Do you need an easy way to add a new primary SMTP address to a group of mailboxes? The following command creates a new e-mail address policy that assigns the @contoso.com domain to the primary SMTP address of all mailboxes with Contoso in the company field:
New-EmailAddressPolicy -Name Contoso -RecipientFilter {Company -Eq “Contoso”} -EnabledPrimarySMTPAddressTemplate “@contoso.com”

Do you want to retrieve a group of objects that have similar identities? You can use wildcard characters with the Identity parameter to match multiple objects. Type:
Get-Mailbox *John*
Get-ReceiveConnector *toso.com
Get-JournalRule *discovery*

Do you want to configure a group of objects that have similar identities? You can use a wildcard characters with the Identity parameter when you use a Get cmdlet and pipe the output to a Set cmdlet. Type:
Get-Mailbox *John* | Set-Mailbox -ProhibitSendQuota 100MB
This command matches all mailboxes with the name “John” in the mailbox’s identity and set the ProhibitSendQuota parameter to 100MB.

Most cmdlets let you pass the output of one noun to another noun in order to view or modify related objects. For example, you might want to set the mailbox limit on all mailboxes that reside in a specific mailbox database on a server. You can do this by using this command:
Get-MailboxDatabase “Executives” | Get-Mailbox | Set-Mailbox -ProhibitSendQuota 300MB
This command retrieves all the mailboxes that reside in the “Executives” mailbox database and sets their ProhibitSendQuota value to 300MB.

Forgot what the available parameters are on a cmdlet? Just use tab completion! Type:
Set-Mailbox -
When you type a hyphen ( – ) and then press the Tab key, you will cycle through all the available parameters on the cmdlet. Want to narrow your search? Type part of the parameter’s name and then press the Tab key. Type:
Set-Mailbox -Prohibit

Say goodbye to ping. Say hello to Test-MapiConnectivity! Use Test-MapiConnectivity to troubleshoot connectivity problems between your users and your servers. Combine Test-MapiConnectivity with a variety of cmdlets to target your specific issue without having to manually dig for the information:
Mailboxes: Get-Mailbox | Test-MapiConnectivity
Mailbox databases: Get-MailboxDatabase | Test-MapiConnectivity
Servers: Get-MailboxServer | Test-MapiConnectivity

Do you want to add an alias to multiple distribution groups that have a similar name? Type:
Get-DistributionGroup *Exchange* | Add-DistributionGroupMember -Member kim
This command adds the alias “kim” to all distribution groups that contain the word “Exchange”.

Do you want to record exactly what happens when you’re using the Exchange Management Shell? Use the Start-Transcript cmdlet. Anything that you do after you run this cmdlet will be recorded to a text file that you specify. To stop recording your session, use the Stop-Transcript cmdlet.
Notice that the Start-Transcript cmdlet overwrites the destination text file by default. If you want to append your session to an existing file, use the Append parameter:
Start-Transcript c:\MySession.txt -Append

Here’s a handy tip for repeating a command a given number of times. Instead of writing a For loop, use the following syntax:
1..10 | ForEach { “do something here” }
For example, the following command creates 10 new storage groups that have the names sg1 through sg10 on the server TestServer:
1..10 | ForEach { New-StorageGroup -Name “sg$_” -server TestServer }

Do you want to know when your mailbox databases were backed up last? Type:
Get-ExchangeServer | Get-MailboxDatabase -Status | Format-Table Name, *Back*

Do you want to move all the mailboxes from one mailbox database to another? You can do this easily by using the following command:
Get-MailboxDatabase
| Get-Mailbox | Move-Mailbox -TargetDatabase
You can even use wildcard characters with the Get-MailboxDatabase cmdlet to consolidate mailboxes from multiple source mailbox databases into a single destination mailbox database.

Do you have a user who has network access but maintains an external mail account outside your Exchange organization? With Exchange Server 2007, you can now create mail-enabled users that are regular Active Directory accounts, but also behave like mail-enabled contacts. By using the Enable-MailUser cmdlet, you can add e-mail contact attributes to any existing Active Directory user who does not already have a mailbox on an Exchange server. Users in your Exchange organization will then be able to send e-mail messages to that user’s external mail account. Type:
Enable-MailUser -Identity -ExternalEmailAddress

Do you want to change the default prohibit send quota for a mailbox database? Type:
Set-MailboxDatabase -ProhibitSendQuota
You can specify a bytes qualifier when you use the ProhibitSendQuota parameter. For example, if you want to set the prohibit send quota to 200 megabytes, type:
ProhibitSendQuota 200MB
You can also configure the IssueWarningQuota parameter and the ProhibitSendReceiveQuota parameter in the same way.

Do you want to know what version of Exchange Server each of your servers is running? Type:
Get-ExchangeServer | Format-Table Name, *Version*

Do you want to know which Exchange 2007 servers have not yet been configured with a valid product key and whether their trial period has expired? Type:
Get-ExchangeServer | Where { $_.IsExchange12TrialEdition -Eq $true } | Format-Table Name, *Trial*

Do you want to determine whether a server is running Exchange Server 2007 Standard Edition or Exchange Server 2007 Enterprise Edition? Type:
Get-ExchangeServer | Format-Table Name, Edition
If you want to view which edition all your Exchange servers are running, omit the parameter.

Do you want to create a new resource mailbox that can be used to book a meeting room? Type:
New-Mailbox -Name -UserPrincipalName -Database -OrganizationalUnit -Room
This command creates a disabled Active Directory user who has a mailbox that accepts meeting requests from users.

Do you want to add a disclaimer to all outbound e-mail messages? Type:
$Condition = Get-TransportRulePredicate FromScope
$Condition.Scope = “InOrganization”
$Condition2 = Get-TransportRulePredicate SentToScope
$Condition2.Scope = “NotInOrganization”
$Action = Get-TransportRuleAction ApplyDisclaimer
$Action.Text = “Sample disclaimer text”
New-TransportRule -Name “Sample disclaimer” -Condition @($Condition, $Condition2) -Action @($Action)

Do you want to control the properties of e-mail messages sent to a specific domain? Use the RemoteDomain cmdlets. Create a new remote domain by using the New-RemoteDomain cmdlet. Type:
New-RemoteDomain -Name “Contoso.com Configuration” -DomainName contoso.com
Then modify the properties that you want for this remote domain by using the Set-RemoteDomain cmdlet:
Set-RemoteDomain “Contoso.com Configuration” -AutoReplyEnabled $True -AutoForwardEnabled $True

You can control which features are available to Outlook Web Access users by using the Set-OwaVirtualDirectory cmdlet. Type:
Set-OwaVirtualDirectory “OWA (Default Web Site)” -ContactsEnabled $True -ChangePasswordEnabled $True

Booleans are parameters that can be evaluated as either $True or $False. Booleans are typically used as a flag on an object that modifies the behavior of that object. In the Exchange Management Shell, you must supply a Boolean parameter with either a $True, $False, 1, or 0. No other values are accepted, including True or False. For example, the following commands both set the ExternalDsnSendHtml parameter to $True:
Set-TransportServer -ExternalDsnSendHtml $True
Set-TransportServer -ExternalDsnSendHtml 1

Do you want to remove all e-mail messages that were sent from a certain domain name from a server’s queues without generating a non-delivery report (NDR)? Type:
Remove-Message -WithNDR $False -Filter { FromAddress -Like “*@contoso.com” }

Do you want an easy way to apply deleted item retention limits across multiple databases and servers? Try the following command to configure deleted item retention across all databases on a specified server:
Get-MailboxDatabase -Server | Set-MailboxDatabase -ItemRetention 45.00:00:00
You can also apply the same deleted item retention limits or mailbox retention limits across all servers in your organization:
Get-MailboxDatabase | Set-MailboxDatabase -ItemRetention 45.00:00:00 -MailboxRetention 120.00:00:00

Do you want to know what permissions an Active Directory user account has on a specific mailbox? Use:
Get-Mailbox | Get-MailboxPermission -User

Do you want to know which mailboxes a specific Active Directory user has permissions to? Type:
Get-Mailbox -ResultSize Unlimited | Get-MailboxPermission -User | Format-Table Identity, AccessRights, Deny
Caution: This command enumerates all the mailboxes in your organization. If you have lots of mailboxes, you may want to target specific mailboxes.

Do you want to get a list of the backup status of all mailbox databases in your organization? Type:
Get-MailboxDatabase -Status | Format-Table Name, Server, *Backup*
How about just the mailboxes on a specific server? Type:
Get-MailboxDatabase -Server -Status | Format-Table Name, *Backup*

To retrieve the current status of an Exchange server or database, use the Status parameter. For example:
Get-ExchangeServer -Status | Format-List
Get-MailboxDatabase -Server -Status | Format-List

Do you want to view the mounted status of all mailbox databases? Type:
Get-MailboxDatabase -Status | Format-Table Name, Server, Mounted

What’s the difference between server-side filtering and client-side filtering? Server-side filtering is used with the recipient and queue cmdlets, which support the Filter parameter, because these cmdlets can return large result sets. The server filters the results by using the criteria you specify, and then sends you the filtered results. Client-side filtering can be used with any cmdlet. The entire result set is sent to the client computer, which then filters the data and provides a filtered result set. Client-side filtering uses the Where-Object cmdlet, which can be shortened to Where.

With Exchange Server 2007 Unified Messaging (UM), you can redirect unauthenticated callers to certain telephone extensions to an operator instead of to the extension that was dialed. To list users for whom UM transfers unauthenticated callers to the operator, instead of to the user, type:
Get-UMMailbox | `
Where-Object { $_.AllowUMCallsFromNonUsers -eq `
[Microsoft.Exchange.Data.Directory.Recipient.AllowUMCallsFromNonUsersFlags] “None” }

You can use client-side filtering to return only the data that you want to see or work with. The following example retrieves all Active Directory user accounts that are in the Engineering department and puts the results in a table with two columns, Name and Department. By using the ResultSize parameter, the Get-User cmdlet limits the result set to 2,000 users.
Get-User -ResultSize 2000 | Where { $_.Department -Eq “Engineering” } | Format-Table Name, Department

The special variable $_ represents the objects being passed from one cmdlet to another cmdlet in the pipeline. The $_ variable is automatically initiated by the shell and is bound to the current pipeline object. You can access the properties of the object assigned to the $_ variable as you would any other object. The following example shows how you can view the Name property of each mailbox object that is passed through the pipeline:
Get-Mailbox | ForEach { $_.Name }

You can import CSV files and treat them as objects by using the Import-Csv cmdlet. Each row in a CSV file becomes an element in an array, and each column becomes a property. You can assign the CSV file to a variable or you can pipe its contents directly to another cmdlet. In the following example, there are three columns in the CSV file, Name, Alias and EmailAddress, with several rows that the ForEach cmdlet will cycle through. The data in each row is used to create a new mail contact.
Import-Csv | ForEach { New-MailContact -Name $_.Name -Alias $_.Alias -ExternalEmailAddress $_.EmailAddress -OrganizationalUnit Users }

Do you want to customize your Exchange Management Shell profile? Run the following command to determine the location of your Microsoft.PowerShell_profile.ps1 file is:
$Profile
You may have to create the PSConfiguration folder and Microsoft.PowerShell_profile.ps1 file. After you’ve done that, you can add your favorite functions and aliases, which will be loaded every time that the Exchange Management Shell is opened.

Use the following commands to configure a managed folder policy that will enforce a maximum personal e-mail folder size of 10MB on all the mailboxes in your organization.
New-ManagedFolder -Name “Reference e-mail folder with 10mb quota” -FolderName “Personal and Reference E-mail” –StorageQuota 10MB
New-ManagedFolderMailboxPolicy “Personal Folder Policy” -ManagedFolderLinks “Reference e-mail folder with 10mb quota”
Get-Mailbox -ResultSize Unlimited | Set-Mailbox -ManagedFolderMailboxPolicy “Personal Folder Policy”
Set-MailboxServer -ManagedFolderAssistantSchedule “Sun.12:00-Sun.11:00″

Do you want to see everything that occurs when you run a command? Include the Verbose parameter with the command. This parameter instructs the Exchange Management Shell to display detailed information about each action that the server takes to complete the command. This information can be useful in troubleshooting.

Any cmdlet that accepts a size value lets you specify whether the integer value is in kilobytes (KB), megabytes (MB), gigabytes (GB), or terabytes (TB). For example:
Set-Mailbox “Kim Akers” -ProhibitSendQuota 200MB

The Exchange Management Shell can log all the Exchange-related commands that modify objects in some way. Exchange-related command activity is logged to the PowerShell event log. To enable Exchange-related command logging, run the following command:
Set-ItemProperty HKLM:\SOFTWARE\Microsoft\PowerShell\1\PowerShellSnapIns\Microsoft.Exchange.Management.PowerShell.Admin -Name LogpipelineExecutionDetails -value 1

There are many more useful Exchange 2007 Powershell commands to learn. These are just the tip of the iceburg.